
Angular App in Azure - Part II: Azure App Service and DevOps
This is the second blog post in my series about taking an Angular App to Azure. In my first blog post I gave a general outline of the project, today I’d like to write about how I employed hosting in an Azure App Service and about the Azure DevOps Pipelines to build and deploy the app.
While I do have some code, yet, my backend code is nothing more than stubs that were created as examples by .NET Core. I don’t think that posting any of it here will be helpful for anyone, hence this post will still be low on code. This will probably change with the following posts.
Azure App Service
There are resources online on how to create a Azure App Service, for example here, therefor I will not explain how to create a App Service in Azure, but focus on the configuration required for this project. A little reminder: The frontend of the website will be created with Angular, the backend with .NET Core web services. Mauricio Trunfio wrote a great article (to be found here) on how to deploy an Angular app to Azure.
The web.config file
A very basic Angular App would run on an Azure App Service with (virtually) no configuration. Anyway, as soon as routing comes into play, everything gets a bit more complicated. Therefor a web.config file is required for the Angular project, that will cause all routes to fallback to index.html (see here for a more detailed explanation). The web.config that will allow Angular routing has to look like this (hold on, this is not the final version, yet)
<configuration>
    <system.webServer>
      <rewrite>
        <rules>
          <rule name="Angular" stopProcessing="true">
            <match url=".*" />
            <conditions logicalGrouping="MatchAll">
              <add input="{REQUEST_FILENAME}" matchType="IsFile" negate="true" />
              <add input="{REQUEST_FILENAME}" matchType="IsDirectory" negate="true" />
            </conditions>
            <action type="Rewrite" url="/" />
          </rule>
        </rules>
      </rewrite>
    </system.webServer>
</configuration>
Where does my API go?
Since I had a hard time deploying both my API and the Angular App to the same virtual application in my Azure App Service, I decided to deploy the API to another virtual application, at /api. The virtual application can be set up in the section Settings > Application settings in the App Service, under the headline Virtual applications and directories (see Figure 1).

I’ve chosen the path site\api as the physical location of the application, but you are quite free to choose whatever you deem appropriate (1).
I assumed that this would make the API available at https://coffeefriends.azurewebsites.net/api, but due to the web.config for the Angular app, every route of the path /api was rewritten to https://coffeefriends.azurewebsites.net, which rendered the API unusable. This required another change to my web.config:
<configuration>
    <system.webServer>
      <rewrite>
        <rules>
          <rule name="Angular" stopProcessing="true">
            <match url=".*" />
            <conditions logicalGrouping="MatchAll">
              <add input="{REQUEST_URI}" pattern="^/api" negate="true" />
              <add input="{REQUEST_FILENAME}" matchType="IsFile" negate="true" />
              <add input="{REQUEST_FILENAME}" matchType="IsDirectory" negate="true" />
            </conditions>
            <action type="Rewrite" url="/" />
          </rule>
        </rules>
      </rewrite>
    </system.webServer>
</configuration>
this adds an exception to the rewrite rule, preventing /api to be rewritten.
Azure DevOps pipelines
Azure DevOps has quite a steep learning curve and is rather complex. It is, however, definitely worth it. I will elide the part about how to get started with Azure DevOps and assume that you already have an account (or know how to create one). Azure DevOps is available via https://dev.azure.com. I have created a Build Pipeline, which triggers a Deploy Pipeline to build, test and deploy everything to my App Service. Way more complex scenarios are conceivable, though.
The build pipeline
From Azure DevOps, build pipleines can be found at Pipelines > Builds. When creating a new Build pipline, first an assistant is presented to create a build pipeline with a standard configuration (see Figure 2).
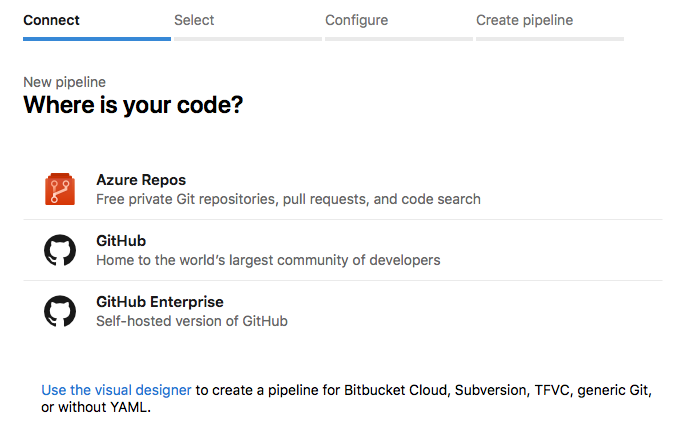
Settings up the source for fetching the source code
Since I am hosting my code on GitLab, I had to create my pipeline using the visual designer (see the link in the image, just below GitHub Enterprise). This will take us to the following screen
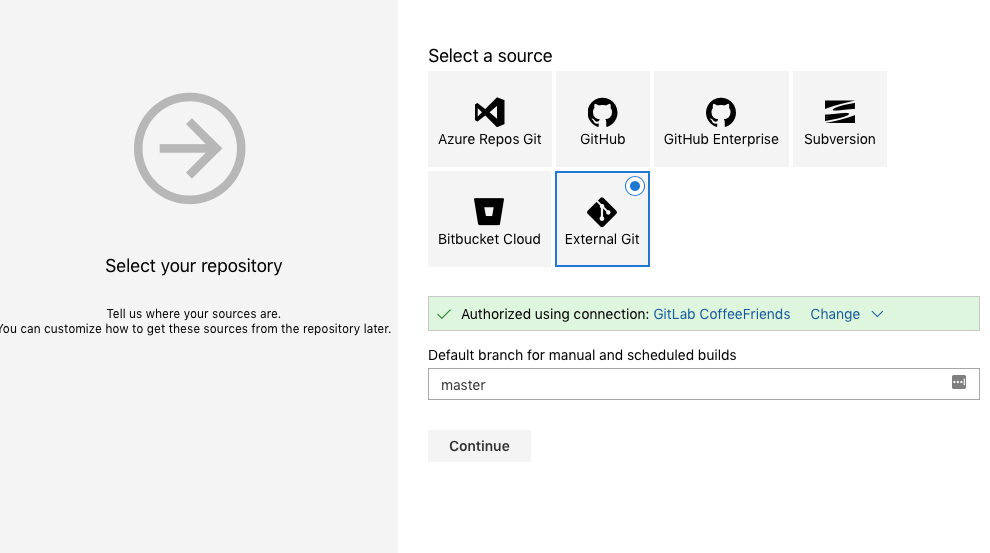
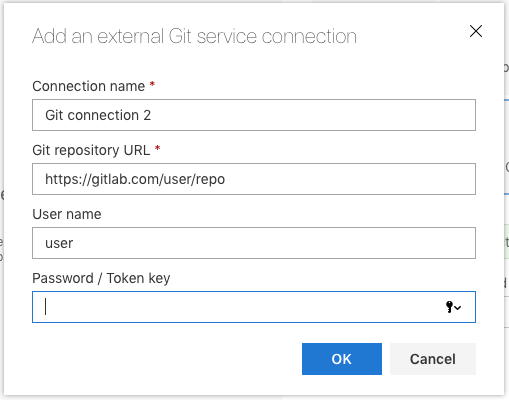
For Git servers other than GitLab, External Git has to be selected. A service connection has to be created to connect to the Git server. The form to create a service connection (as presented in Figure 4) is pretty self-explanatory. Both the actual password for the server and access tokens can be set up for authentication. For security reasons I’d suggest using access tokens.
After the service connection is set up, the branch of the repo can be selected (see Figure 3).
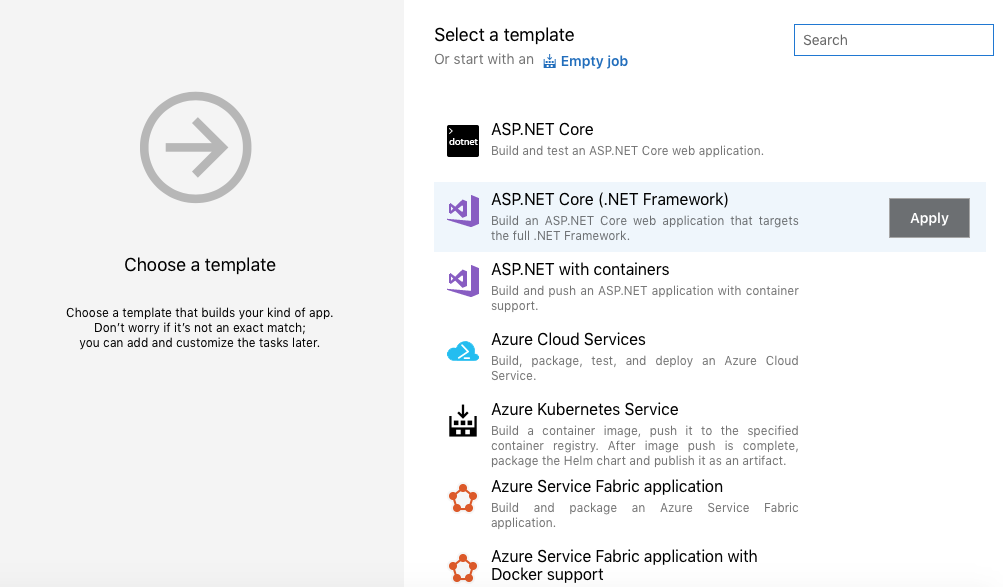
Setting up the build pipeline for the .NET Core API
In the last screen the type of the pipeline can be selected. Since I am building a .NET Core API, I selected ASP.NET Core which sets up an appropriate pipeline for the API. This way, I only had to add tasks to build and deploy the Angular App.
Building the Angular App
For my project I have chosen the following folder structure (this is important for building the Angular app):
./api: My .NET Core API./coffeefriends: My Angular App
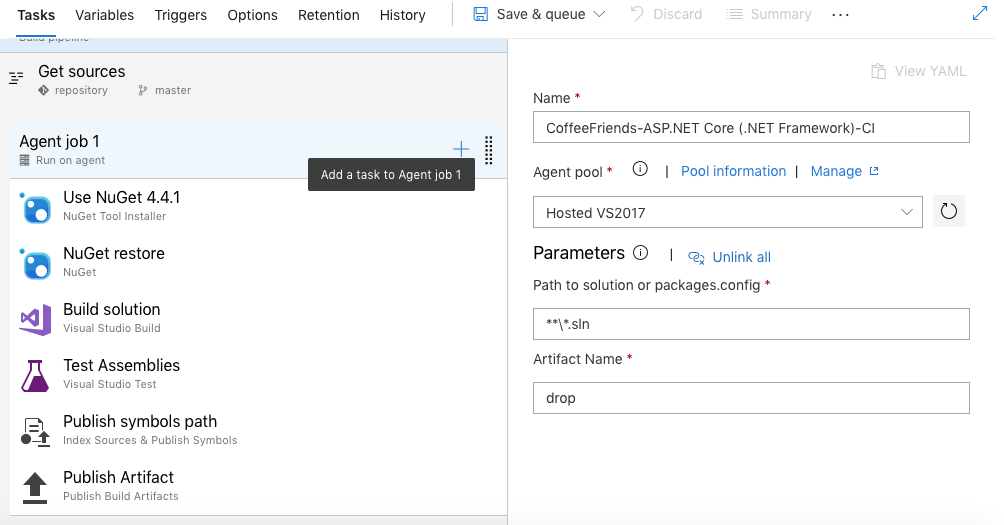
In Figure 6 you see the Pipeline that was set up by Azure, just by choosing to build a .NET Core app. Running the pipeline now would check out the Git repo and perform all steps necessary to build the API.
To build the Angular app there are 3 futher steps to add:
- Installing the Angular CLI
- Restoring the packages of the app
- Building the app via Angular CLI
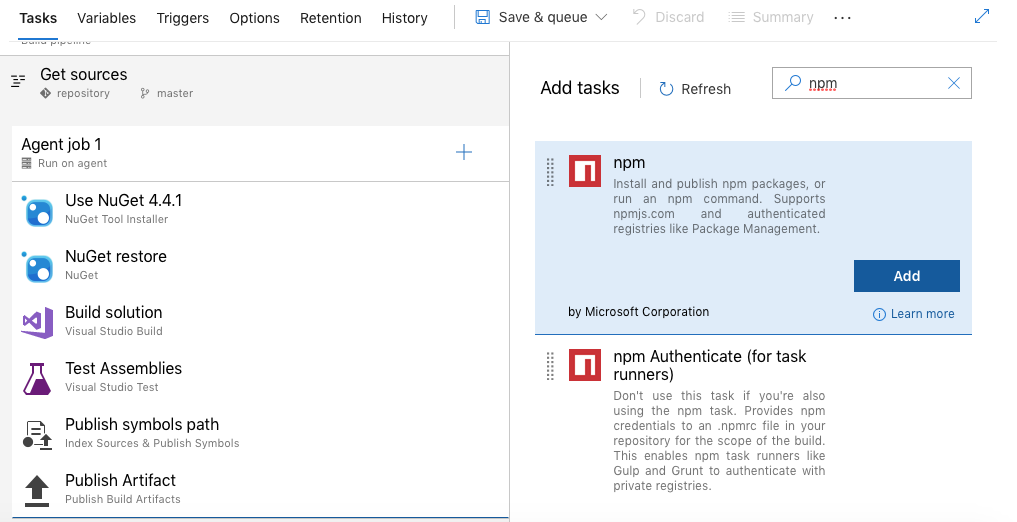
To install the Angular CLI and restore the packages, two npm build steps are required. The Command for the first one is set to custom with the custom command install -g @angular/cli, this will install the Angular CLI on the build agent. The Command for the second one remains install (should be selected by default). Since the Angular App is located in ./coffeefriens/, the npm install command has to be executed in that directory (since it is looking for a packaje.json file in the directory it is executed in).
The task to actually build the Angular App is displayed in Figure 7. It is a Command Line task, that runs the following commands
cd coffeefriends
ng build --prod
to build the app in production configuration (2).
Packaging
The default ASP .Net Core pipeline publishes the results from building the .NET Core API to an Artifact named drop.zip. I’ve added another Publish Artifact task with the following configuration:
- Path to publish:
coffeefriends\dist(This is the folder where the built Angular App is saved to) - Artifact name: drop
Since the artifact name is set to drop, too, the contents from coffeefriends\dist will be added to drop.zip alongside to the API.
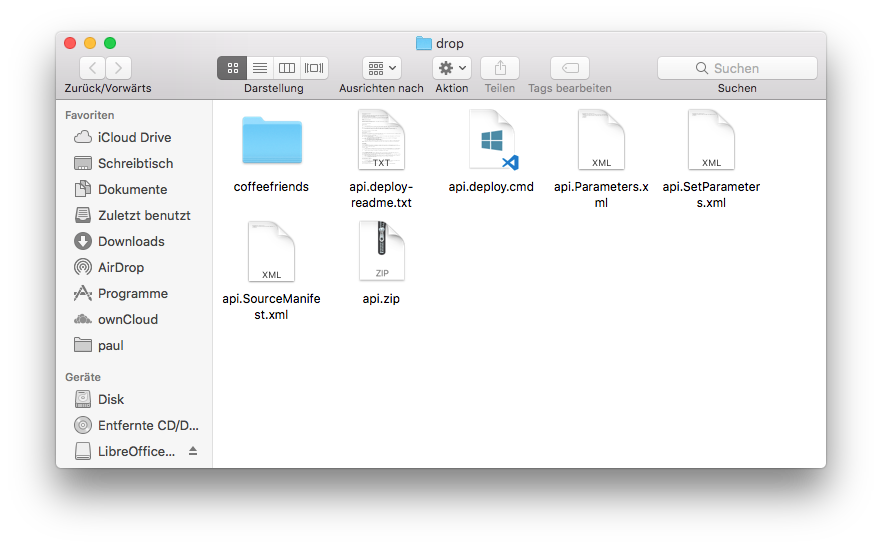
Figure 8 shows the contents of the drop.zip file. The root contains the api.zip that in turn contains the API to be deployed to the App Service. The ./coffeefriends path contains the built Angular App.
The Release Pipeline
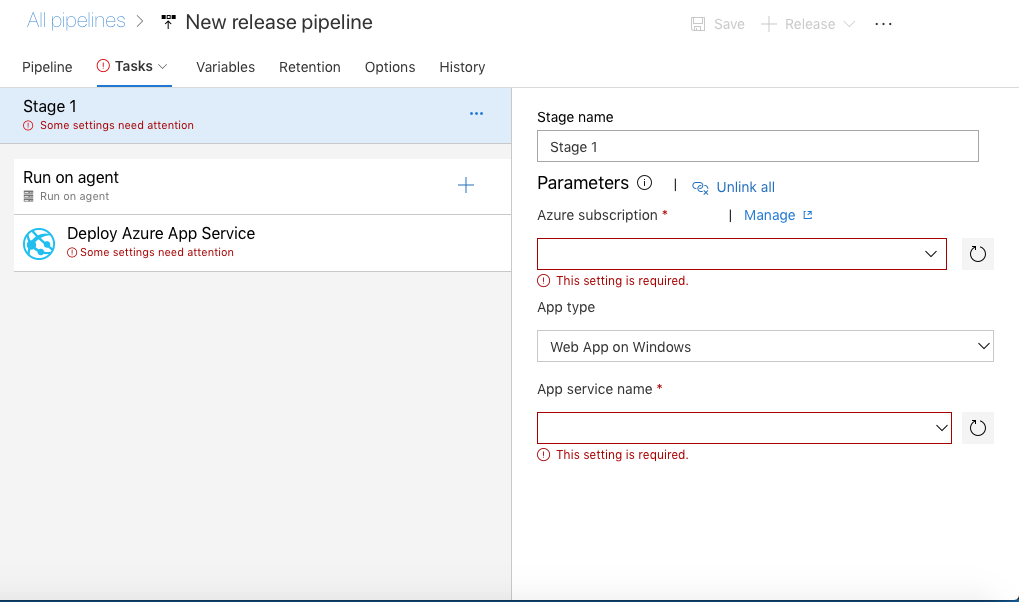
Release pipelines are accessible via Pipelines > Releases. When creating a new release pipeline we can select Azure App Service deployment which creates a default pipeline that deploys the .NET Core API to our root application.
Before anything can be deployed, it’s necessary to set up the Azure subscription and App Service name (Figure 9).
Deploying the API
Since I’d like to deploy my API to the virtual application at /api, I had to select that virtual application in the deployment task (see Figure 10)
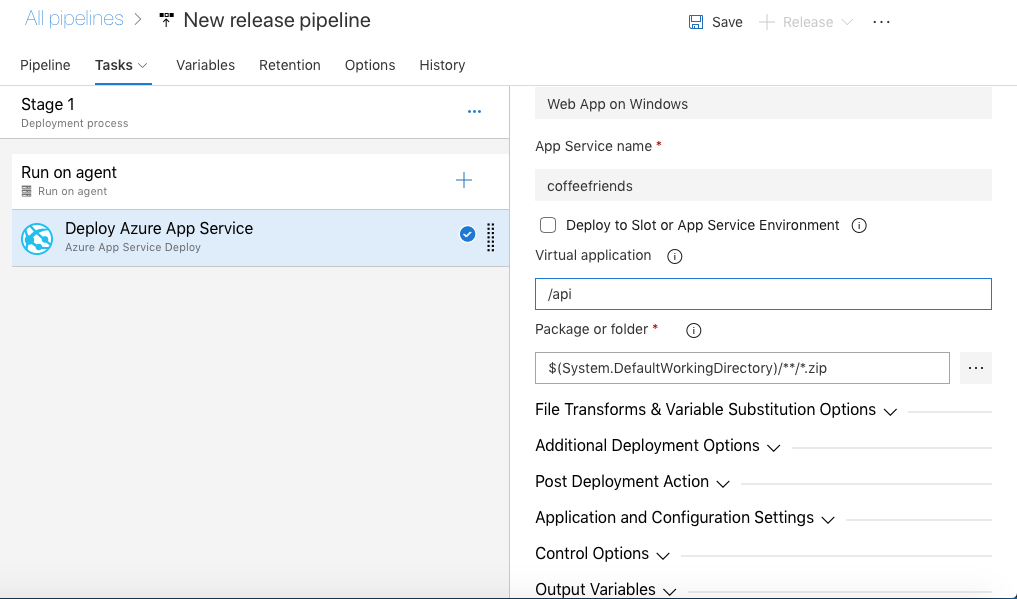
The default task is set up correctly to deploy a .NET Core app, therefor there is nothing left to do here.
Deploying the Angular app
Furthermore I had to set up another Azure App Service Deploy task to deploy the Angular app (see Figure 11 )
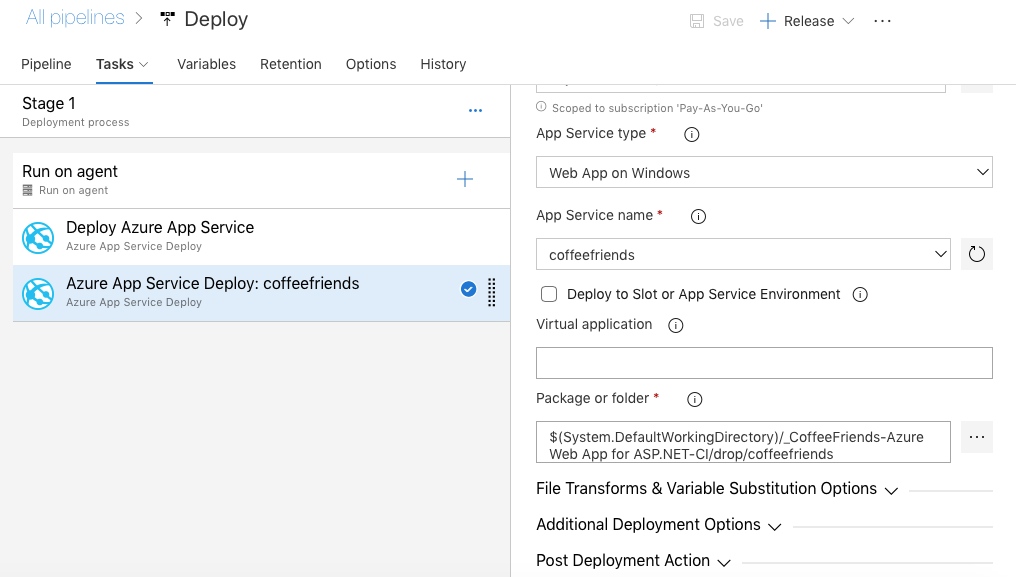
Since the Azure app shall be deployed to the root of the App Service, the field Virtual application has to be left empty. The folder depends on the alias we are giving the artifact (see below), the name of the artifact and the name of the angular app. Later, when the build artifact is set up, I’s also possible to browse to select the folder to deploy.
Set up the artifact
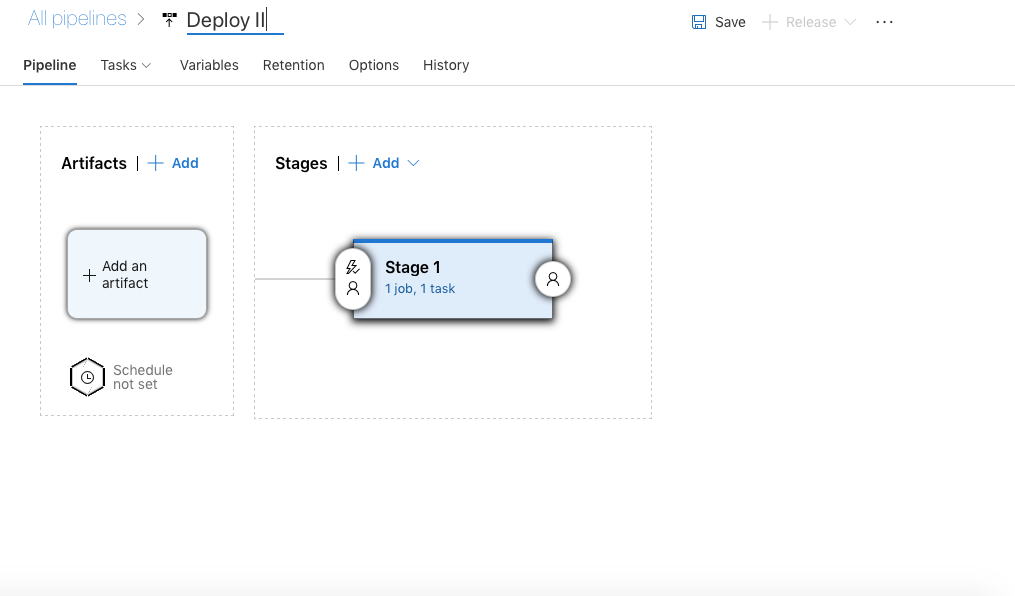
Back in the pipeline view, it’s now required to set up an artifact for the release pipeline (see Figure 12).
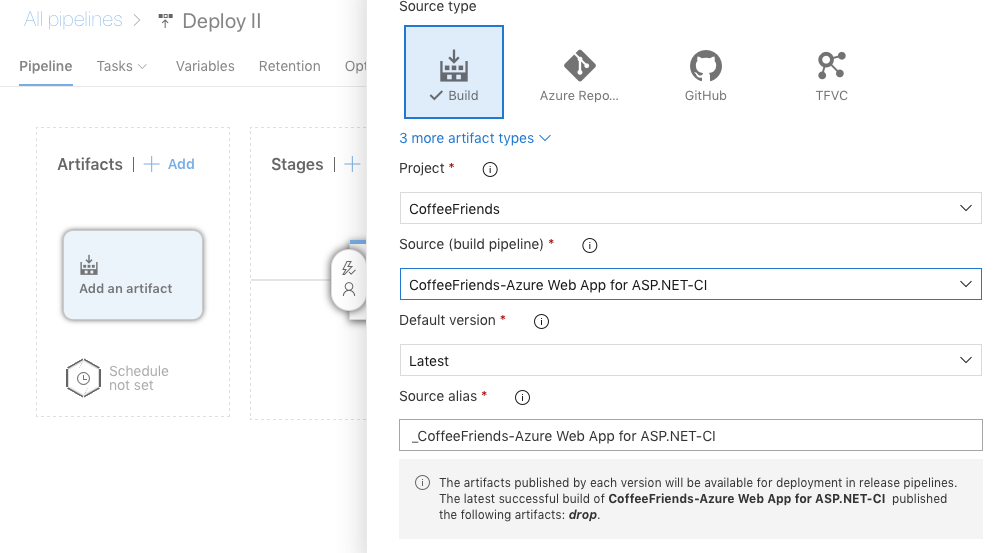
To use the Artifact from the build pipeline, the type Build has to be selected. The following options are configurable:
- The project to get the artifact from (defaults to the current project)
- The build pipeline that builds the respective artifact
- Which version of the artifact to use
- I’ve opted to Latest, but there are other possibilities, such as restricting the releases to certain tags, which would be useful for QA/staging environments
- An alias for the artifact, should be safe to use the default here, unless you have more specific needs (multiple artifacts, etc.)
Making it continuous
Although the CI/CD pipelines are in place, there is nothing continuous about them, yet. They build and deploy CoffeeFriends, but only if I triggered them. Yikes! Since I’d like the CoffeeFriends website to reflect the current state of the project, I’d like to build and deploy on (virtually) every commit to master.
Disclaimer: While this is okay for a toy project like this, it would be totally unacceptable in any production website. Appropriate processes shall be employed to ensure that only appropriately tested code is deployed.
The continuous integration has to be set up in the build pipeline. When editing the build pipeline, CI triggers are available on the Triggers tab, see Figure 14
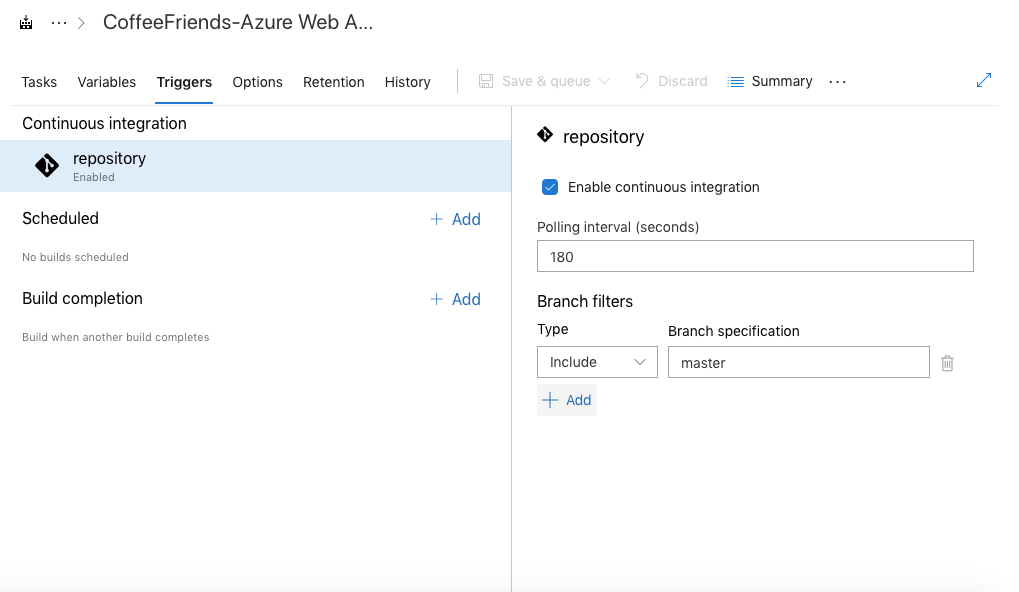
For reasons unknown, the checkbox to enable CI was checked by default for me, but the build pipeline was not triggered on new commits. After unchecking the checkbox and then checking it again, it did work, however. This is sufficient for continuous integration to run, but we’d still have to trigger the deployment manually. Hence we have to set up a trigger for the release pipeline. Triggers on the release pipeline are available form the pipeline view on the build artifact (see Figure 15).
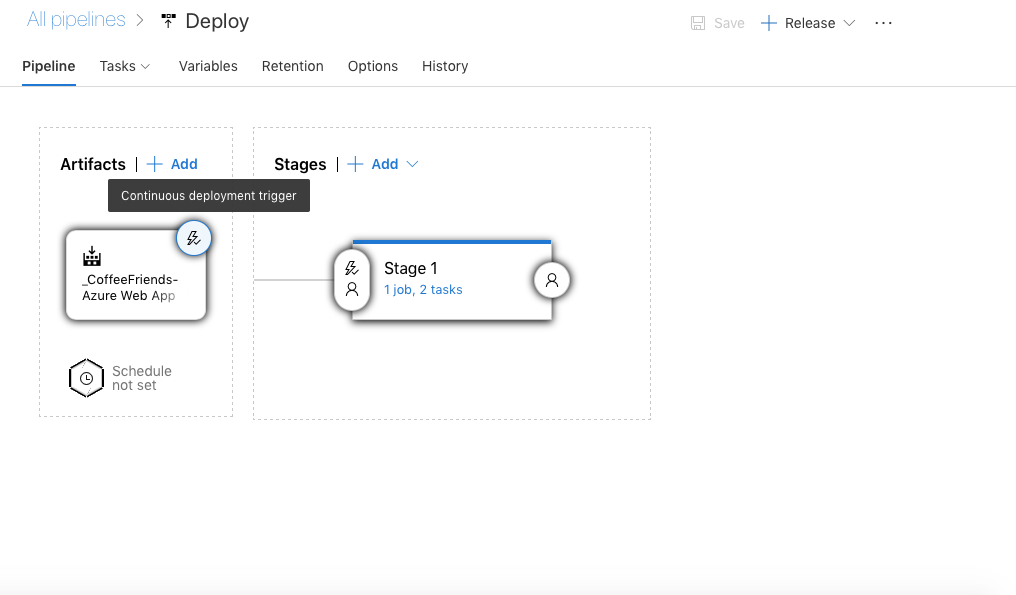
After enabling the CD trigger the branch to build from has to be selected (master in my case). Afterwards, the website will be built and deployed after every push (3).
Wrap-up
This has been a long post on how Azure can be used to Host an Angular/.NET Core website within one App Service and how to set up Azure DevOps for the continuous integration and deployment of that website. Obviously these steps are quite specific to the way I structured my app and the way how I wanted to deploy it. Anyway, I hope that this information will help anyone that struggles to set up Azure to host an Angular app with a .NET Core API.
In my next post I will shed light on authentication/authorization with Azure AD B2C and JWTs. Since I’ll first need to write some more code, this might take some time. Check https://coffeefriends.azurewebsites.net in the meantime to check whether I made progress. If you read this I’d be happy to hear from you, wheather you liked it or you have suggestions how I can improve, please feel free to contact me (see my Twitter below).
Footnotes
-
I would like to remind the kind reader that I do not deem my solution the best one at any rage. What I present here is what worked best for me and I sincerely hope, that my explanations might help anyone, but if there is anything that can be improved, please feel free to contact me (see the footer of this page for my Twitter). ↩
-
The distiction between development and production configuration will become crucial for accessing the API and for OpenID Connect authentication. ↩
-
Actually not on every push. I kept the default of 180 s, which means that it’ll check for changes every 3 minutes, but practically the pipeline will likely by ran for virtually every push. ↩